
Introduction
The Product Price By Size module is a powerful solution for Prestashop store owners who will be selling products which are cut / tailored to size for customers. Customers should be able to enter the dimensions they require on the product page and these should be used to calculate a dynamic price.
For example, store owners may be selling DIY products such as glass sheets, wood skirting, wood pieces, fabrics, cloths or stationery such as signage which would have a dynamic price according to the area using a formula such as £1.00 per m2.
So in short, if you need dynamic prices for your product which are calculated based on measurements or values the customer enters then the Product Price By Size module is an ideal solution.
The module also provides s9olutions for selling products based on pack area, where each pack contains products which cover a certain area, such as tiles, wallpaper, rolls, paints etc.
Installation
The installation procedure is very much similar to most other Prestashop modules. No core changes are required therefore installation is straight forward. Be sure to follow the instructions below for a successful installation:
- Upload the module folder to your store’s module folder:
{root}/modules/ - After uploading the module, in the Prestashop Back Office, head over the to the Modules section.
- Search for the module and choose the install option
- After a successful installation the module is ready to be used. Initially the module’s main configuration page will be displayed. We’ll take a look at how to use the module in this user guide.
Configuration
Lets begin by taking a look at the global module configuration before we look at configuring individual products. Open the global module configuration from the module panel below:

After opening the module configuration you should now see several tabs; namely: Dimensions, Units, Equation Templates and Mass Assign. Let’s take a look at each one.
Dimensions
A dimension is the field which appears on the product page in the store front into which the customer can enter a value such as height, weight etc. Under This tab we can define the dimensions available globally in your store. Later on, when setting up individual products, we’ll be able to choose which dimensions appear for specific products.
To add a new field click the New Dimension button in the top right of the screen
You should see form with the following options
[Name]
The name of the dimension, for example: width.
[Display Name]
The translatable text which appears in the store front for this dimension. Enter text for each language using the language selector in the field
[Hint Image]
You can define an image which will appear when the user hovers over the dimension name in the store front. You can provide an image for each language in your store.
Units
Each dimension is accompanied by a unit of measurements, for example, inches, meters etc. The module comes preinstalled with the most frequently used units, however you can add your own here using the New Unit button in the top right of screen. This will present you with the following form options:
[Name and Display Name]
These are the same as the dimension name and display names fields.
[Conversion factor]
Enter the equivalent value of this unit in mm. For example when adding a meter unit, the value here would be 1000
Equation Templates
Equation Templates allow you to create global equations which you can later reuse across different products. You can also create individual equations for products. Equation Templates are useful in several products will share the same custom equation.
Equations allow you to define a formula for calculating prices for products in the cart based on the dimensions provided. We’ll cover this in more detail later. For now it’s useful to know this tab exists in case you need to define global equations later.
Mass Assign
The Mass assign feature will allow you to copy all the module settings from one product to multiple destination products or categories. Below is the screen you will initially be presented with:
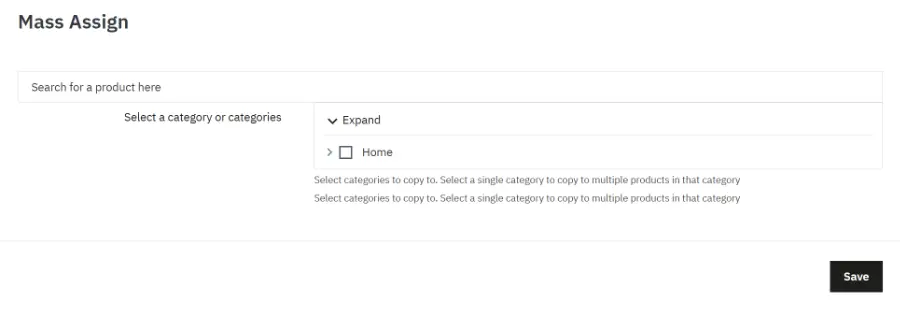
Start by typing the name of the product you wish to copy the module settings from into the field with the text “Search for a product here” and then select the product which appears in the search results.
Next, you can either select a single or category or multiple categories to copy to. The settings will be copied to all products in those categories. If you select a single category, a list of products in that category will appear. You can select individual products in the selected category to copy to. If no products are selected then the settings will be copied to all products in the selected categories.
We’ve now finished looking at the global module configuration. The next thing we’ll want to do is start setting up the module on individual products. Before we start it’s important to understand there are two types of configuration which can be applied to products.
Price by size and area packs.
Price by size should be used for products which have a dynamic price calculated based on measurements the customer will enter.
Area Packs should be used if you sell products in packs and each pack provides a certain area coverage. The customer can provide the area they require and the module will calculate how many packs or quantities of the product are required. Tiles and wallpapers are examples of products which are often sold in this manner.
Lets start by configuring a product for dynamic price sizing.
Setting up Price By Size products
Navigate to Catalog > Products and choose a product and edit.
Under the modules tab you will see the module as shown below, click the configure action
You’ll now see two buttons. Click the Setup dynamic price price product button. This will take you to the dynamic price configuration for this product. You’ll see a few tabs along the top, namely: Options, Fields, Area Based Prices, Price Equations, Weight Equations and Area Stock. We’ll explore each tab below.
Options
You should see form similar to the following.
Lets take a look at all the options
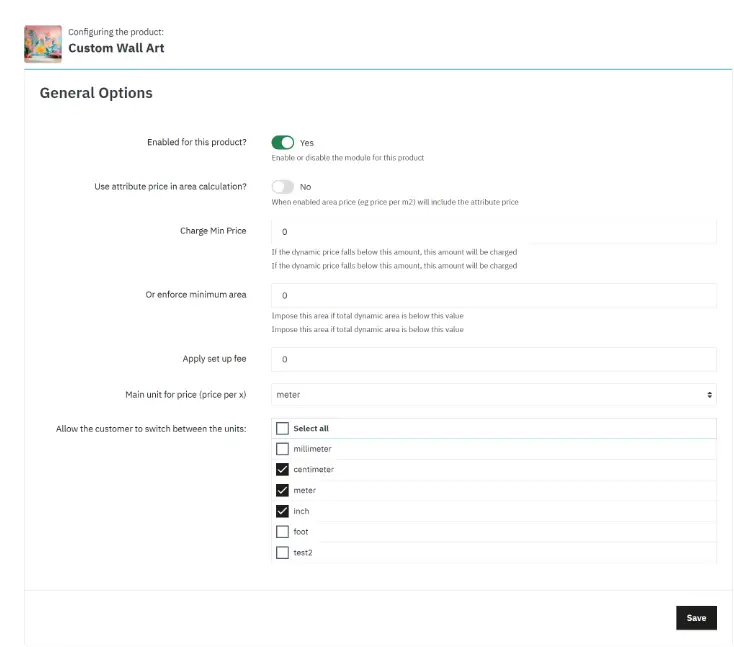
[Enabled for this Product?]
Choose if the module is enabled for this product or not.
[Use attribute price in area calculation]
The default formula for calculating price is as follows:
Price = (([dimension1] x [dimensioon2]…) x product price) + attribute_price
All dimensions are multiplied together with the product price and the attribute price is then added. By enabling this option the defaully formula will change to:
Price = (([dimension1] x [dimensioon2]…) x (product price + attribute price))
[Charge min price]
If the dynamic price falls below this price, then this min price will be applied. Leave empty or zero to ignore.
[Or enforce a minimum area]
Alternatively you can enforce a minimum total area to be used for calculating the price.
[Apply setup fee]
Some products may require a set up fee, this will be added to the dynamically calculated price.
[Main Unit for price (price per x)]
Select the unit which your price per area is based on. E,g if your product price is 1.00€ per m2, select meters.
[Allow the customer to switch between units]
Enable this option to display a list of units the customer can switch between to enter their dimensions in. The module will automatically convert the dimensions into the main unit you set in the option above to ensure the correct area and price is calculated. Only the units added globally will be available here, you can always add more in the global module configuration as described earlier.
Now save the settings before we configure the next tab.
Fields
The fields tab let you assign fields to be displayed on the product which the user can enter values into and which may be used to calculate the product price.
Click the Assign Field button to launch the form to add a new field. The following form is displayed:
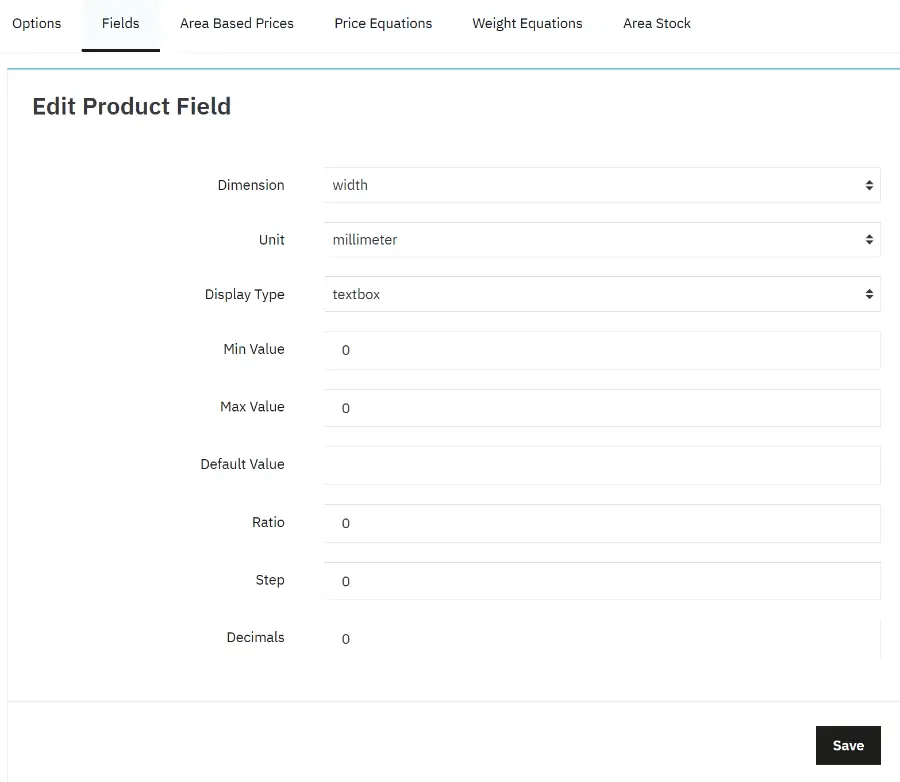
Lets take a closer look
[Dimension]
Select the dimension from the list of available global dimensions.
[Unit]
Select the default unit which applies to this field.
[Display Type]
Select either textbox or drop down. If you select a dropdown, you’ll be able to add a lisdt of dropdown values after you save this form.
[Min Value]
The minimum numeric value that the input will accept, otherwise the customer will see a warning next to the field.
[Max Value]
The maximum numeric value that the input will accept, otherwise the customer will see a warning next to the field.
[Default Value]
The default value to appear in this field when the module is initially displayed.
[Ratio]
This defines the ratio between this field and the field before it. For example, if you created another field before this and you set the ratio to this new field to 2, then this field new field will always be 2 x first field or first field will always be half the 2nd field value. The ratio rule is applied automatically across all fields as the user enters their measurements or values.
[Step]
Define the increment to be applied to the value in this field. For example, if you set the step setting to 0.5, the value the customer enters will automatically be rounded to the closest 0.5. So, if the customer enters 1.7 it will be rounded up to 2.
Leave the setting empty if you do not wish to apply a step rule to the field.
[Decimals]
Number of decimals the customer entered measurement or value will be automatically converted to.
Now save your settings. If you set the field type to dropdown, a new new grid with the option to add dropdown values will appear below the form above.
Area Based Prices
Area Based Prices allow you to influence the dynamic price based on the total area the customer has entered. Click the add area based price button to add a new rule. You should see the form below:
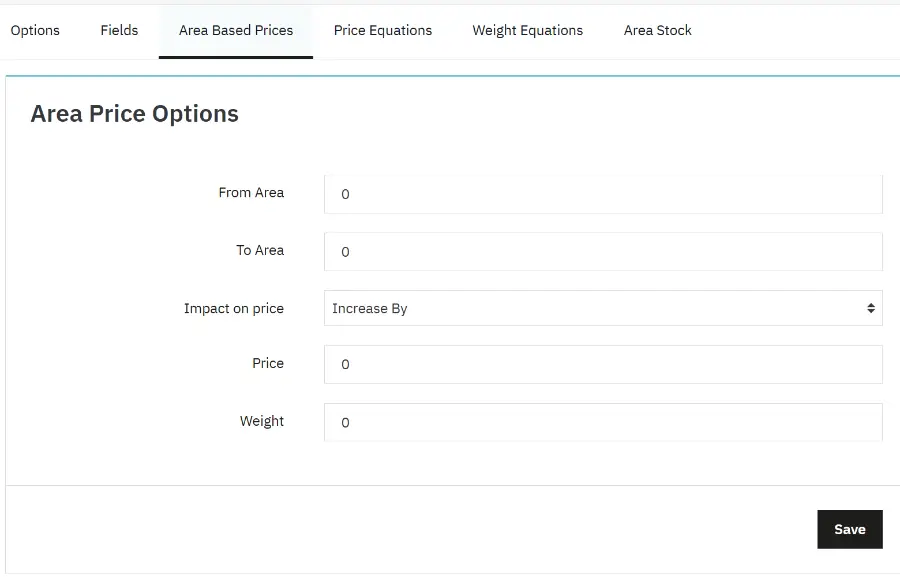
[From Area]
The area lower limit to which this rule applies to.
[To Area]
The area upper limit to which this rule applies to.
[Impact on Price]
Choose the type of impact from the following:
Increase by: This will increase the price per m2 (or whichever unit you product uses) by the amount you enter in [price] field.
Decrease by: This will decrease the price per m2 (or whichever unit you product uses) by the amount you enter in [price] field.
Fixed static price: This will apply a fixed price for areas which fall the range of this rule.
Fixed area price: This allows you to define a fixed area price to be applied to this rule, eg: 1.20€ per m2.
[Weight]
Enter a fixed weight to be applied to the product in the cart if the area falls into this area range. Dynamic product weight based on area is useful for carriers which charge shipping by weight.
Price Equations
It was mentioned earlier the module uses a default formula for calculating prices based on the fields assigned to a product. However, the module also allows you to define your own formula for calculating a dynamic price. You can either create a custom equation for your entire product or for individual attribute combinations.
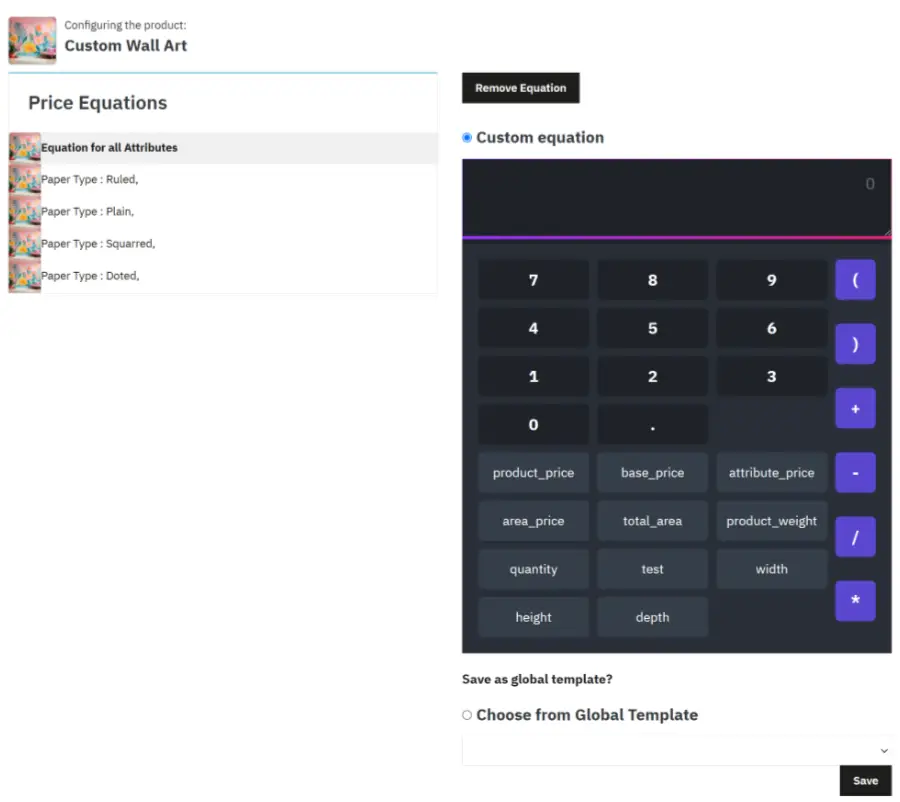
Select a combination or equation for all products on the left hand side to edit the custom equation for that entry. You can now either enter a custom equation directly into the equation editor or [choose from a global template]. Global templates were discussed earlier when we were configuring the global settings for the module.
When entering a custom equation you may decide you will need to reuse this equation for other products in the future, in which case you can save it as a global template without leaving this page. Simply click the Save as Global Template? Link and enter the name of the template and click the save as template button.
Weight Equations
Weight equations can be used to allow the module to calculate dynamic weights based on the various parameters. A dynamic weight will then be calculated in the cart which Prestashop can then use to determine shipping costs based on your carrier configurations.
The Weight Equations tab is more or less identical to the Prices Equations tab.
Area Stock
The area stock tab allows you to define the amount of area you have available. If you r product has combinations you may provide area stock level for each combination individually.
If using this feature, the customer will be prevented from purchasing a product if they are attempting to purchase a total area greater than that available in stock.
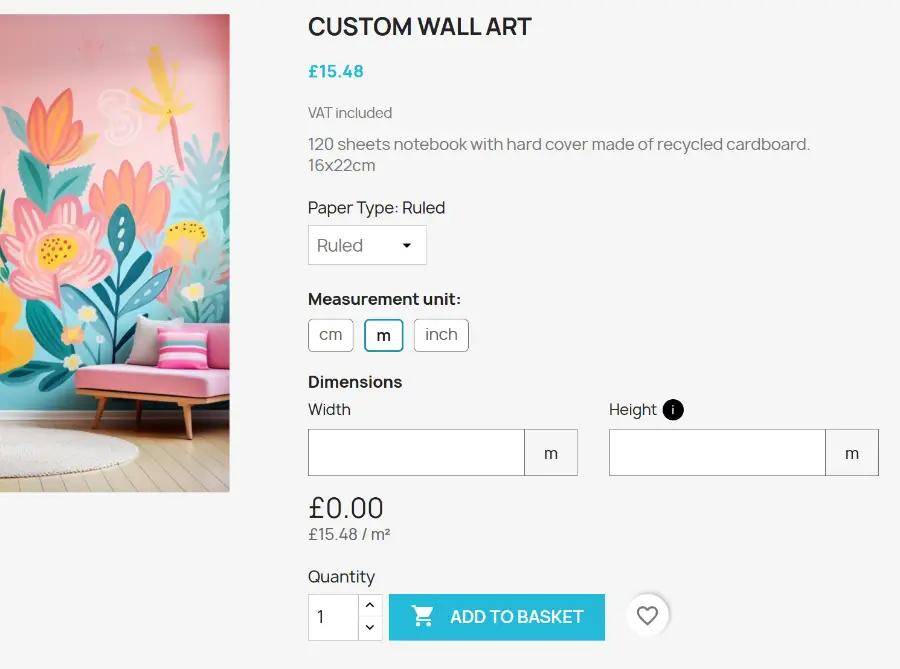
You’ve now completed the configuration for dynamic price based products. In the front end you should see something similar to the screen shot below:
Next we’ll look at configuring products sold by pack area.
Setting up Pack Area Products
If you need to sell products sold by area in packs and require a widget on the front end which allows the customer to enter measurements and calculate the quantity / number of packs required then you can configure your product as an pack area product instead. To begin, as before head over to Catalog > Products and edit a product then choose this module under the modules tab.
Now click the setup area packs product button. This will redirect you to the area pack configuration for the product you are editing and present you with the form below:
Lets take a look at the form options
[Choose type of area packs]
Choose from one of 3 options, namely “Normal”, “Wallpapers / Rolls” and “Paint / Liquids”
Normal Area Based
Using this method, you must tell the module how much total area each quantity of the product will cover. For instance, how much area one box of tiles will cover. This will allow the module to calculate how many boxes of tiles the customer requires based on the area the customer enters into the widget.
As en example, let us assume the following:
Pack Area is 5m2. Therefore each box of tiles will cover 5m2 of a wall / floor.
Customer enters the following:
Width: 3m
Height: 3m
Based on the above, the module will perform the following calculation to calculate how many quantities are required:
Qty Required = (Height x Width) / Pack AreaTherefore
Qty Required = (3 x 3) / 5
Qty Required = 1.8
Quantities will always be rounded up, therefore
Qty Required = 2Dynamic Price based on Area
This option will change the method by which the product total is calculated during checkout. Instead of charging the customer price per box / quantity, this method will calculate based on total area ordered in the following manner:
dynamic price = (product price x pack area) x quantity requiredAs an example let us assume each pack contains an area coverage of 0.68m2 and the customer orders 37m2. Each pack or quantity of the product is priced at £43.90.
Quantity Required is calculated as described in the previous section:
Quantity required = Total Area / Pack Area
Quantity required = 37 / 0.68
Quantity required = 55
And consequently:
dynamic price = (43.90 x 0.68) x quantity required
dynamic price = (43.90 x 0.68) x 55
dynamic price = £1641.86
Rolls / Wallpapers
If you are selling wallpapers or similar roll based products, the method of calculating how many rolls are required differs and is not as straightforward as the normal calculation discussed above.
When using this method for calculating quantities, you must enter both the height and width of each roll (Roll Height and Roll Width).
Furthermore you must activate the ‘height’ and ‘width’ fields in the fields displayed list and both must have the internal names, height and width.
Let us assume each roll has a height of 10.5m and a width of 0.53m and that the customer will be covering an area of 2m height and 6m height.
The module will calculate how many rolls are required as follows:
First the module will calculate the number of strips required:
Strips required = Width of walls / roll width
Strips required = 6 / 0.53
Strips required = 11.32
Next, the module calculates how many strips in each roll
Strips per roll = Roll Height / Walls Height
Strips per roll = 10.5 / 2m
Strips per roll = 5.25
Using the above, the module can calculate how many rolls are required:
Rolls Required = Strips Required / Strips Per Roll
Rolls Required = 2.15
Finally, this is rounded up:
Rolls Required = 3
Paints & Liquids
Works in a very similar fashion to the Normal Area method. However, the customer will also have the option to select the number of coats required on the product page and add multiple walls to assist the customer with the final quantity calculation.
[Unit for area]
The main unit of area used for the quantity of area in each pack / roll / tun etc.
[Show the following wastage options %]
Allow the customer to select from these wastage options as a percentage. The module will add this percentage in addition to the area they require when calculating how many packs or rolls they require.
[Pack Area]
The total area in terms of coverage that each pack or quantity of the product will contain. This should be in the main unit area you set earlier.
Now let’s look at the Product Fields tab
Product Fields
Add fields to display on the product page such as width and height. To assign a field click the assign field button in the top right corner.
In addition to the fields you assign, the module will also display a total area field on the product page.
Combinations
The combinations tab allows you to provide a different pack area for different attribute combinations in the product.
Now that you have finished setting up the [area pack product, the module should be displayed in your store front similar to what you see below (this can vary based on your configuration)